18 KiB
| title | icon |
|---|---|
| System Hardening | material/monitor-lock |
Setting up Windows after Installation
If you wish to limit the amount of data Microsoft obtains from your device, an offline/local account is recommended.
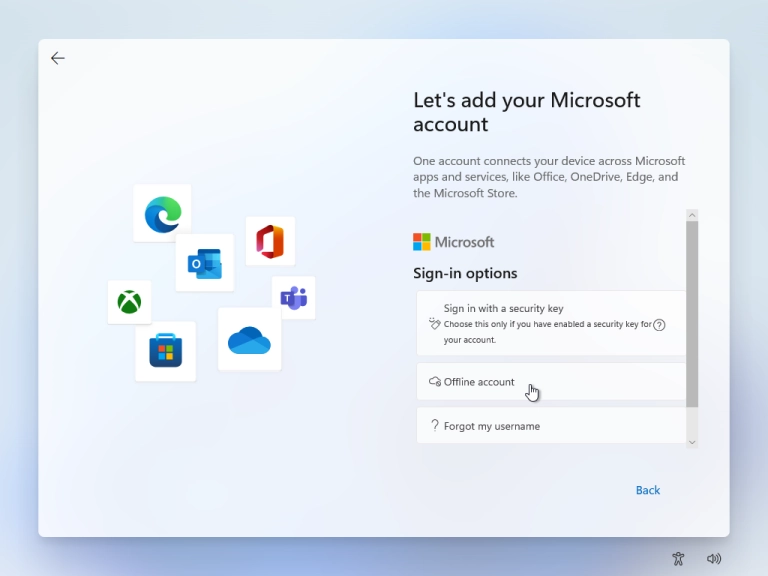
!!! note Microsoft is pushing users to use Microsoft accounts for other editions except Education and Enterprise after installation.
So, You could also follow the guide by [ghacks.net](https://www.ghacks.net/2022/05/13/how-to-bypass-the-microsoft-account-requirement-during-windows-setup/) to bypass the Microsoft account requirement during setup and use Local account.
While setting up, it is recommended to use a generic name such as user and host and avoid identifying terms such as your name or operating system. This can make it more difficult for privileged Win32 apps or attackers to discern your identity.
For security, it's recommended to set up Windows Hello on all of your accounts because it uses the trusted platform module (TPM) if applicable, which protects against brute-force attacks; see the documentation: How Windows Uses the TPM
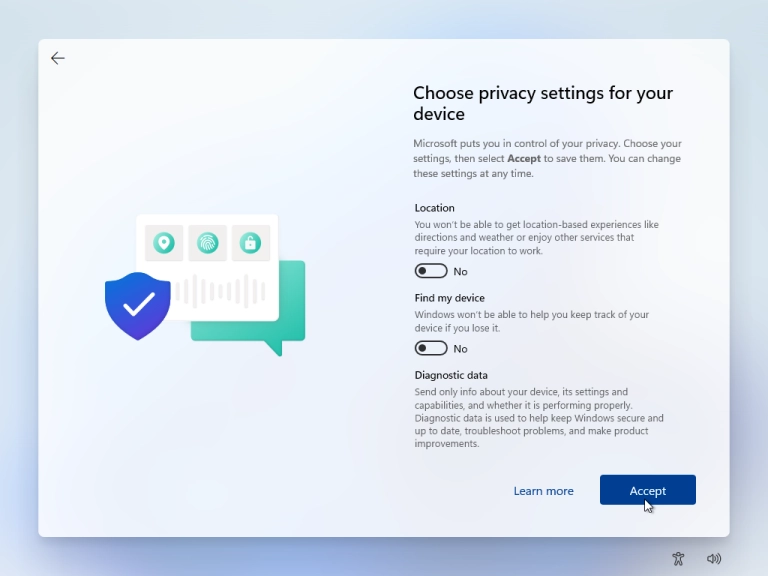
- Toggle off all privacy related settings as shown in the image:
Encrypting the Drive
After you have installed Windows, turn on full disk encryption (FDE) using BitLocker via the Control Panel.
!!! info "Choosing the Way to Encrypt"
It is recommended to use only the Control Panel because if you go to encrypt via settings app, Microsoft named it as Device Encryption and designed it in a way that the encryption keys for BitLocker would be stored on Microsoft's server which is attached to your Microsoft account. This can be dangerous to your privacy and security as anyone who gains access to your account, as could an attacker if they were able to gain access to Microsoft's servers or any Law Enforcement could by a Gag order.
The best way is to go to the Control Panel by searching for it in the Start Menu or from the context menu (right-click) in File Explorer and set it up for all of the drives that you have.
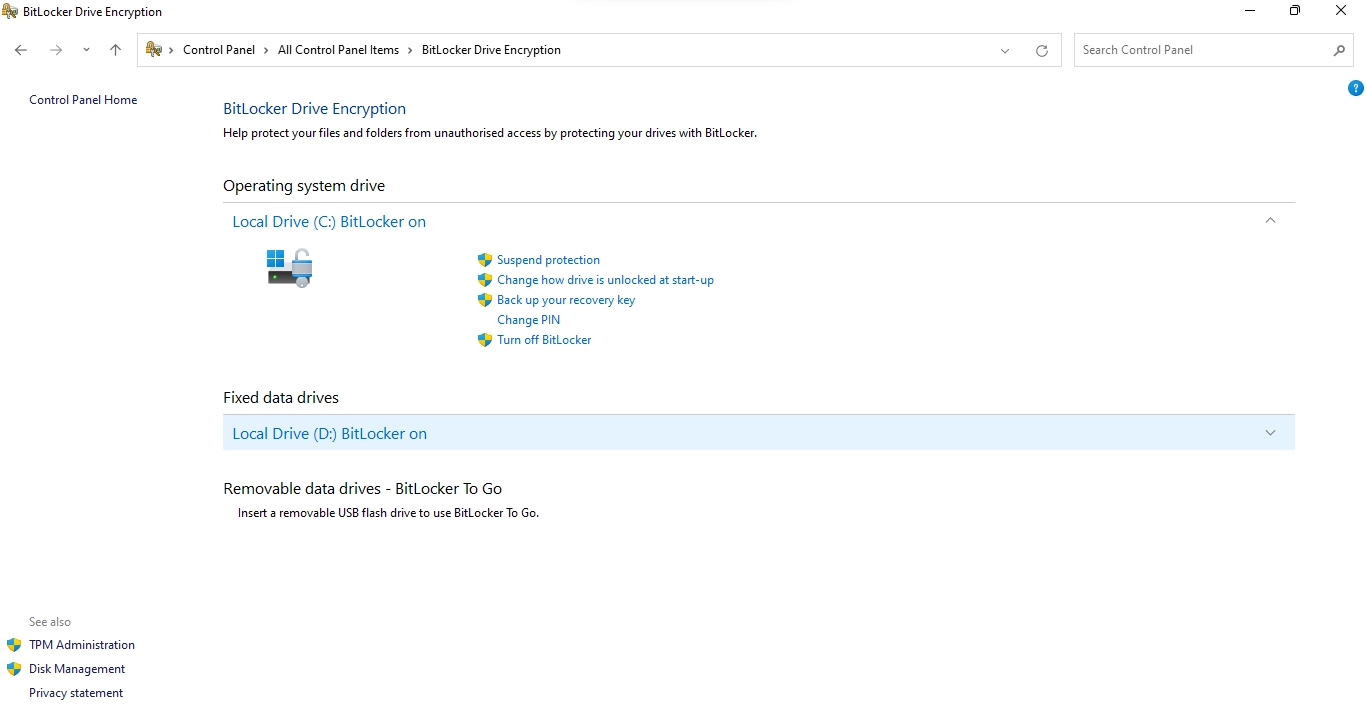
Bitlocker is suggested because of the native implementation by the OS and along with the usage of hardware to be resistant against encryption flaws.
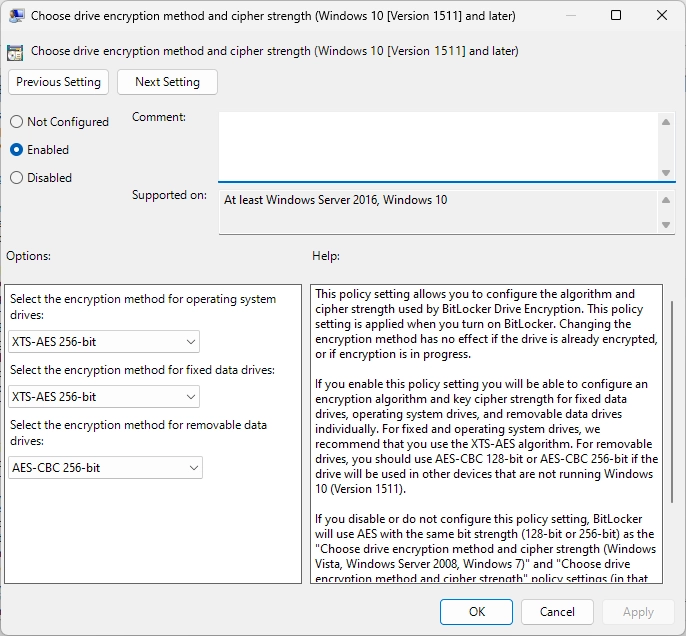
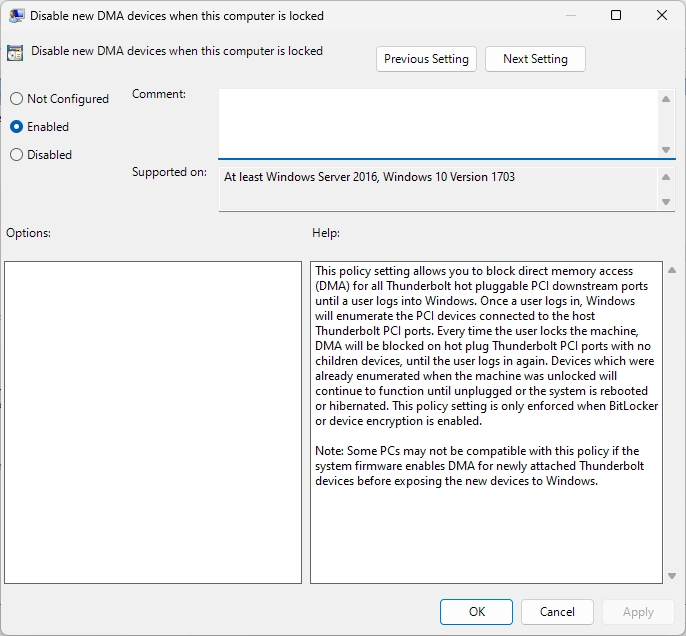
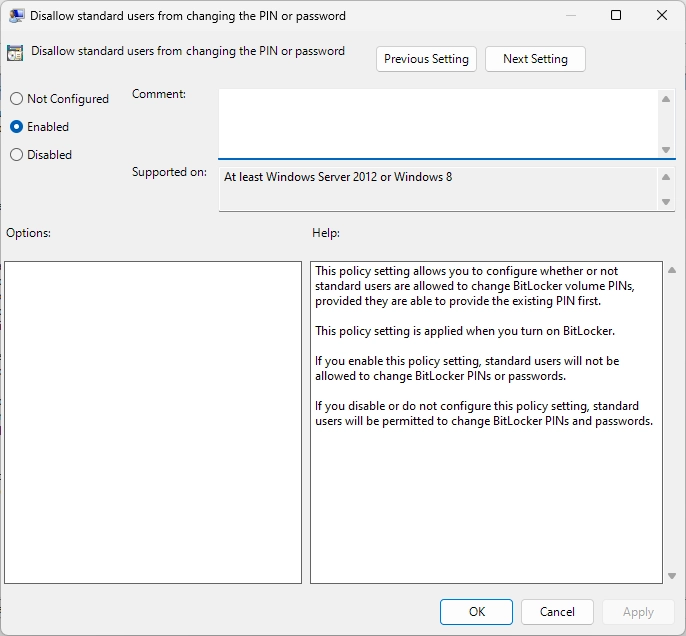
Security policies for Bitlocker
Enable the Following group policies before you start encrypting your drives.
!!! tip
To go to it, search Group Policy in the Windows Search Bar and press Enter or type gpedit.msc in ++win+r++. Then, proceed as mentioned below.
General Policies :
Go to Computer Configuration > Administrative Templates > Windows Components > Bitlocker Drive Encryption
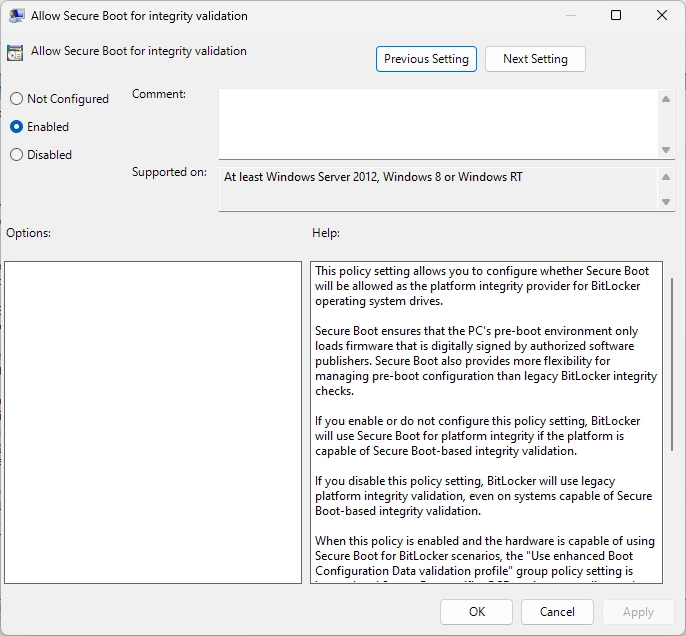
For OS drives :
Go to Computer Configuration > Administrative Templates > Windows Components > Bitlocker Drive Encryption > Operating System Drives
Enable Group policies as in the images below :
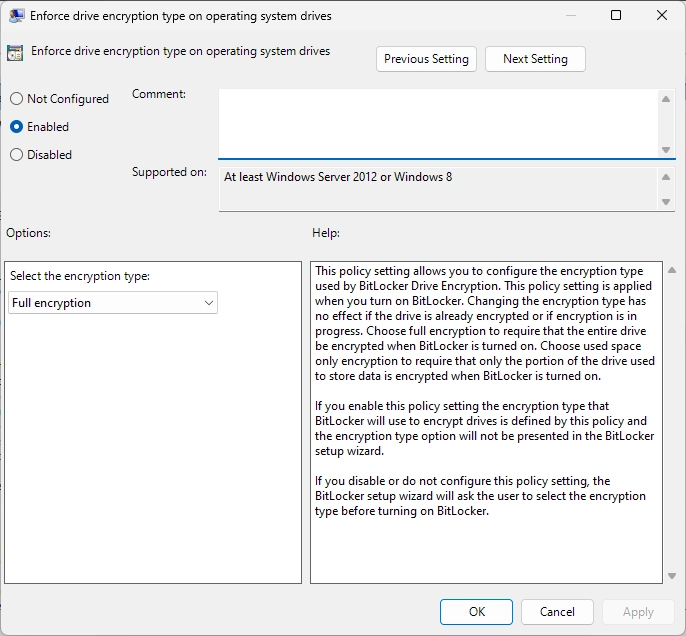
For Fixed Drives :
Go to Computer Configuration > Administrative Templates > Windows Components > Bitlocker Drive Encryption > Fixed Data Drives > Enforce drive encryption type on fixed data drives
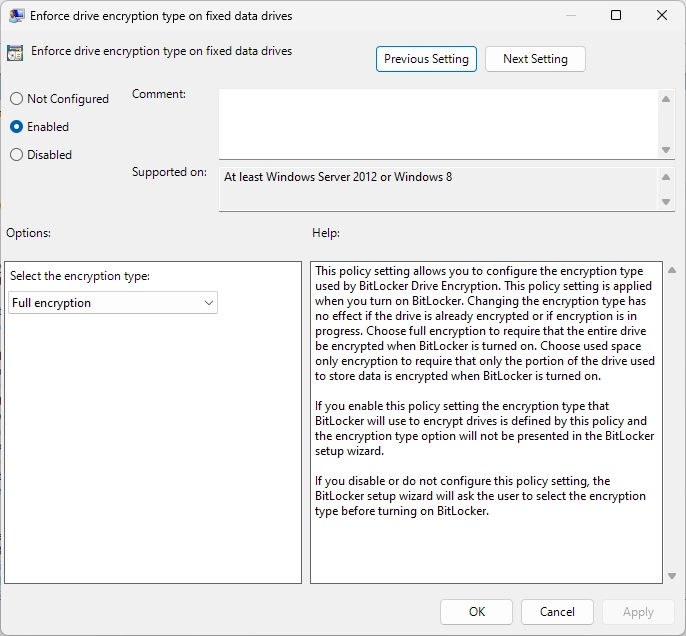
These policies ensure that your drives are encrypted with XTS-AES-256 Bit encryption, fully.
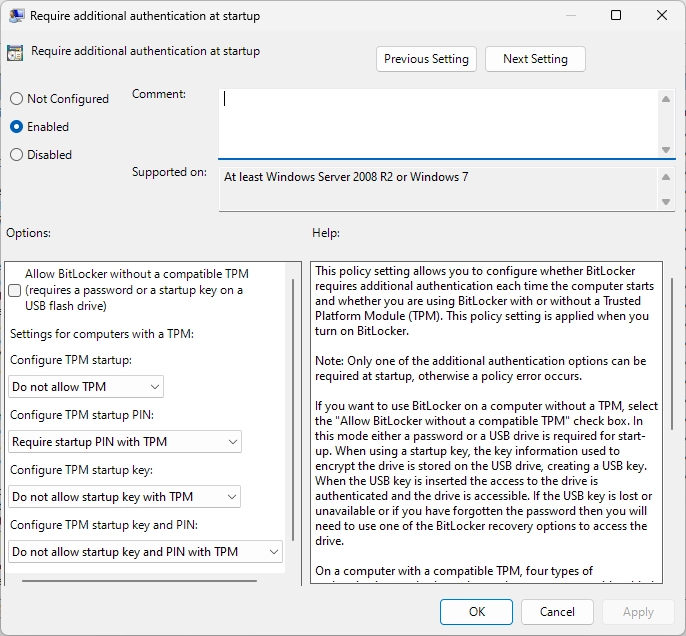
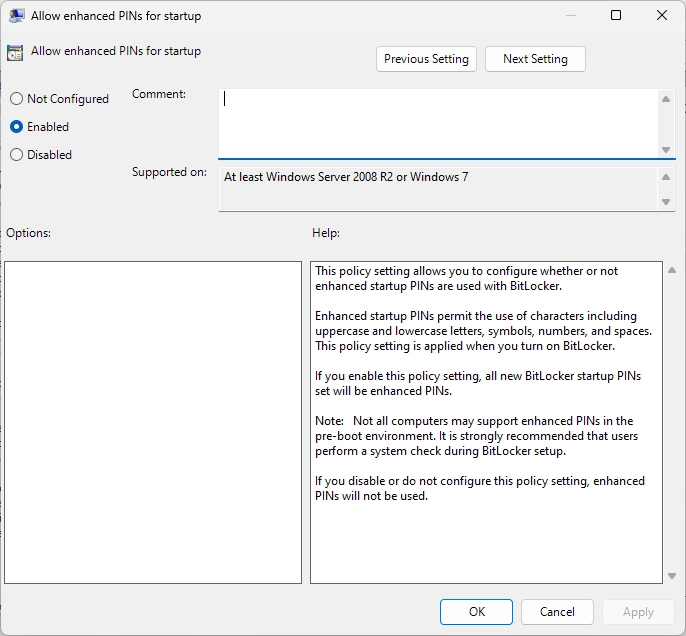
Setting up Pre-boot Authentication
!!! warning "Update your TPM" Before enabling Bitlocker in your device,It is strongly recommended to update your TPM chip by downloading package only from OEM Websites.
As you are using Windows 11, TPM is used to encrypt and decrypt the drive but it is susceptible to cold boot attacks. So, it is recommended to use TPM + PIN to protect the drives
After enabling all the group policies above, Go to Control panel and click on Add PIN. It can be alphanumeric if you had enabled the above policies.
You can check if it's enabled by typing manage-bde -status. It will normally show in Key Protectors: Numerical Password (it's the recovery key) and TPM And PIN.
??? abstract "Disabling pre-boot Authentication (Not Recommended)"
- open a **terminal** as an **administrator** and type this command `manage-bde -protectors -add c: -TPM`.
- You can again check if it worked by typing `manage-bde -status c:` and it will show you **Numerical Password** and **TPM**
!!! info The above Group Policy configuration tells the TPM to release the encryption keys after entering PIN instead of releasing it on boot automatically.
Doing this will set a double password. So, you enter the PIN to release the encryption keys from TPM & boot Windows and another credential to unlock your user account.

The pre-boot PIN not only protects the OS drive but also other fixed drives used just for storage if bitlocker is enabled for that drive also.
When you do this, the encryption keys of your drive are only unlocked once you enter the PIN, and the decryption happens after. If you forget or lose the PIN, you won't be able to access your drives and OS anymore, and the only way to recover is using the Recovery Key provided during the initial setup of BitLocker. Make sure you store it in a safe place, such as a password manager, and keep backups of your Recovery Key or even use an encrypted USB drive.
The preboot authentication is recommend to avoid data being accessed by removal of user Account passwords by methods like this - https://youtu.be/0gOZoroPNuA and access data even though Bitlocker is enabled and managed by TPM
But when you use TPM + Startup PIN, nobody can restart to load the shell and bypass password. Because you need to enter your PIN to go to the Advanced Startup settings as in the video.
Enabling or not-enabling is up to the user's threat model.
If it's a personal device, Startup PIN + TPM is recommended. If a family computer, Normal Bitlocker (Managed by TPM) for OS drive is recommended.
It is recommended to encrypt the OS drive at the least. Encrypting secondary drives either via Bitlocker or other encryption tools such as Veracrypt is upto the user's threat model.
Creation of User Account and usage
-
By Default Windows gives
administratoraccess to the user account. Create anotherstandarduser account to reduce the attack surface enormously as most vulnerabilities today come from the fact that the user is always inadministratormode. In addition, you shouldn't use the same password for standard and administrator account. -
Don't use admin account for any of your personal tasks!
-
Just restrict it to the standard account created.
-
Set UAC settings to the Highest Privilege.
-
Only use your account for you, if someone needs to use your computer ALWAYS create another standard account, even if it's for a one-time use, even if it's your family or someone you trust. This person can plug a malicious USB, can connect to malicious Wi-Fi network, download infectious files, etc... without you knowing about it.
-
You might be afraid that the user accessing your device via another User account can access your Internal drive and access critical files violating your privacy. Refer, Privacy page on How to restrict access to certain drives only or use EFS on a per-file basis. You can read more about EFS on Privacy page.
!!! tip You should ALWAYS do the quick shortcut ++win+l++ to lock your device when you are away to prevent unauthorized access.
- If you don't like managing a standard account, then enforce authentication for Administrator accounts too like Standard ones by following the guide by Wikihow
- This way, Even administrators need to use Password to approve processes instead of just clicking
YesorNo.
- This way, Even administrators need to use Password to approve processes instead of just clicking
Securing the Boot chain
- In your BIOS/UEFI settings, disable the booting of USB devices
- Add a password to your BIOS/UEFI settings which restricts anyone from changing them.
Enabling Secure Boot
-
Windows 11 secures its bootloader by default by using Secure boot with the usage of TPM.
-
Windows 10, on the other hand, doesn't come with Secure boot enabled by default except for new devices.
To enable Secure Boot from the PC BIOS menu. Follow this Step-by-Step Instructions by visiting this documentation.
Visit: https://docs.microsoft.com/en-us/mem/intune/user-help/you-need-to-enable-secure-boot-windows#check-secure-boot-status on how to verify if enabled after enabling secure boot.
Firmware Protection
As there are thousands of PC vendors that produce many models with different UEFI BIOS versions, there becomes an incredibly large number of SRTM measurements upon bootup. Two techniques exist to establish trust here—either maintain a list of known 'bad' SRTM measurements (also known as a blocklist), or a list of known 'good' SRTM measurements (also known as an allowlist).
System Guard lets the system freely boot into untrusted code initially, but shortly after launches the system into a trusted state by taking control of all CPUs and forcing them down a well-known and measured code path. This has the benefit of allowing untrusted early UEFI code to boot the system, but then being able to securely transition into a trusted and measured state.
- Enable System Guard by following the instructions of Microsoft Docs to secure the boot chain.
You can also know how to check if it is enabled or not in the guide.
!!! note System Guard is mostly available on Windows Secured-Core PCs not on regular consumer devices. So, Before enabling it check the requirements of your Device.
Protection against Malware and Viruses
-
Just use the built-in Windows Defender Security to protect against threats and stick to it. Don't use any other Antivirus or Anti-Malware software as it can weaken your security and your privacy.
-
Enable Windows Defender in a Sandbox by launching a terminal as an administrator and copy/paste this command
setx /M MP_FORCE_USE_SANDBOX 1. Restart your device and check if there's a process called MsMpEngCP.exe by typingtasklistin the terminal to verify. -
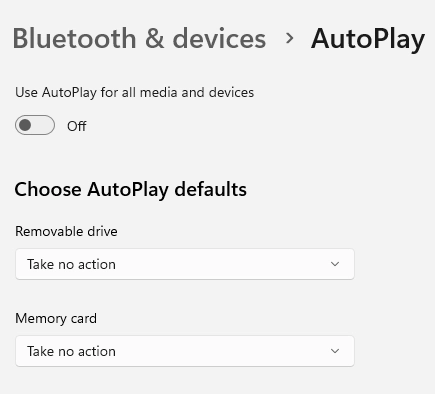
Disable Autoplay for devices so that malware hidden in USB don't execute on plugging in
-
Enable Controlled Folder Access in Windows defender settings. So, The Important folders you listed for protection doesn't get attacked or held hostage in case of a ransomware attack and also stops apps from accessing your important folders. This could also be used as a firewall for the filesystem such as Choosing the drives in the protected ones. And allowing each app when it request access to your device.
-
Enable Microsoft Defender Application Guard. After installing by going to "Turn Windows Features on or off" you can enable it. This runs Microsoft Edge in an Isolated Hyper-V container preventing unknown Malware from damaging the system.
!!! warning When you use Microsoft Defender Application Guard it bypasses the VPN you are using as when you use WDAG is launching the application in what is essentially a virtual machine, so it bypasses the host, where the VPN is connected.
-
Enable Memory Integrity (also called Hypervisor-Protected Code Integrity) in Windows Defender settings which will run important system process isolated in an environment that cannot be attacked by viruses & malware.
-
Enable
Display File Extensionsas most problems start here.??? example "Enabling file extension" On standard Windows settings, Malware can hide itself if the filename is like:
Secure-File.txt.exeWhat you see? A file named `Secure-File.txt` Of course the attacker can add a different icon to the file, so it looks like you open the file type extension you think. And if you open it, the Malware start's. Just Open the File Explorer's settings and change it to show File Extensions by clicking on `View` > `Show` or by configuring via [Registry Editor](https://github.com/beerisgood/Windows11_Hardening/blob/master/always%20display%20file%20typ%20extension)
Apps
- Avoid any types of Cleaning software at all cost. As Microsoft is working on its own implementation specfically designed for windows.
- To Install apps, using the
winget(Windows Package manager). More details in Sandboxing page
Security Improvements
-
Use PeaZip archiver instead of 7-zip as it disables Mark of the Web(MoW) support by default leading to execution of malicious instantly after extracting.
-
Using MS edge or brave over Firefox. Edge is recommended with MDAG mode for secure browsing if security is your priority. Brave is recommeded if content blocking is important for you (Brave shields)
-
Check if Kernel DMA protections is turned on.
-
Use Winget tool to remove Bloatware instead of third party apps.
-
Block all incoming connections in Windows firewall.
- Go to
Firewall & Network Protectionin Windows defender security. - Go to
Domain,PrivateandPublicnetwork settings - Scroll and check the box under Incoming Connections
!!! warning "A note regarding screen casting" If you try to cast your screen to another device or cast another device screen to your device via Wireless display (Optional feature). You won't be able to connect the devices. As we have blocked Incoming connections. Miracast (Wireless casting) requires incoming connection to send data back and forth to show the screen on other or vice versa.
If you want to cast, then disable incoming connections in public network and cast your device and block connection again. There is no problem if you use normal Projection via cable. - Go to
Keeping your device up-to-date
You should keep your Windows Device up-to-date by enabling automatic updates. It is recommended to do so to keep your device with latest security fixes and new features.
To get information about the latest updates, you can look at the Windows Release Information.
It is recommended to stick to driver updates provided via Optional Updates, as they are thoroughly vetted by Microsoft for the stability of your device, and do not rely on third-party apps for driver updates. This way, you get the latest updates and security patches for your drivers along with firmware updates as long as your device is supported by the OEM.
Some Hardware vendors like Nvidia, Intel has their own updater tool which will provide latest drivers.
It is recommended to rather rely on Windows updates or first-party apps.
Credits : The page is mostly made based on the recommendations of Windows Hardening Guide by beerisgood
*[TPM]: Trusted Platform Module *[FDE]: Full Disk Encryption *[UAC]: User Account Control *[WDAG]: Windows Defender Application Guard *[SRTM]: Static Root-of-Trust Measurement